This step-by-step guide will walk you through the process of setting up your events, ordering them by date, and implementing some neat tricks to automate and improve your setup.
Step 1: Setting Up Advanced Custom Fields
- Create a Custom Post Type: Begin by creating a custom post type for your events. In this example, we’ll call it “Dates.”
- Add Custom Fields: For the “Dates” post type, add fields such as title, description, and, most importantly, an event date. The event date is crucial for sorting your events chronologically. When setting up the event date field:
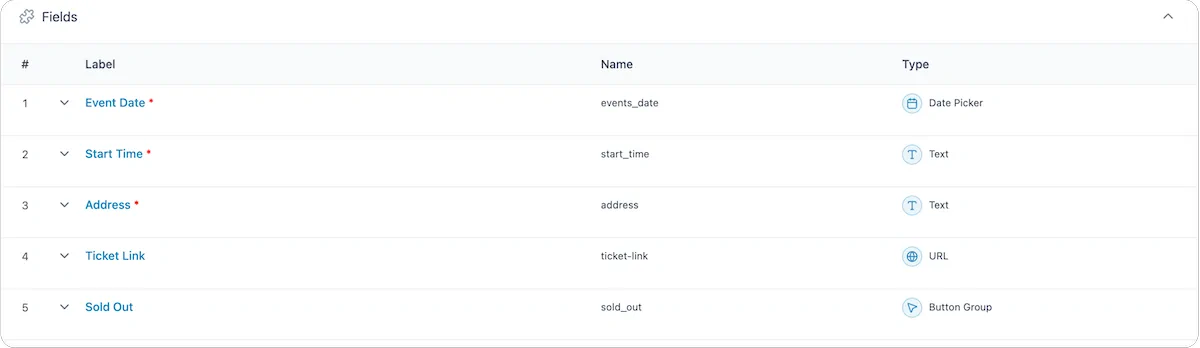
- Choose the “Date Picker” as the field type.
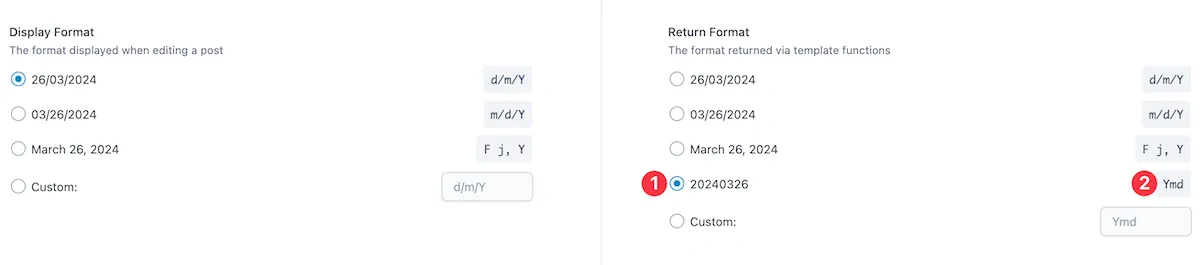
- Set the “Display Format” to your preference for the dashboard view.
- Crucially, set the “Return Format” to ‘Ymd’. This ensures the date is stored in a sortable format in the database (Year, Month, Day).
Step 2: Inputting Events
- Add New Events: Navigate to your custom post type and start adding new events. Ensure the event date is correctly input using the date picker, which will automatically format it according to your setup.
Step 3: Creating the Event List Page with Bricks Builder
- Create a New Page: In Bricks Builder, create a new page for listing your events.
- Add a Query Loop Block: Insert a query loop block where you want your events listed. Customize it with sections for the event image, title, and a text field for the event date and other details.
- Insert ACF Fields: Use the dynamic data feature (lightning bolt icon) to insert your ACF fields, including the event date, into the text sections.
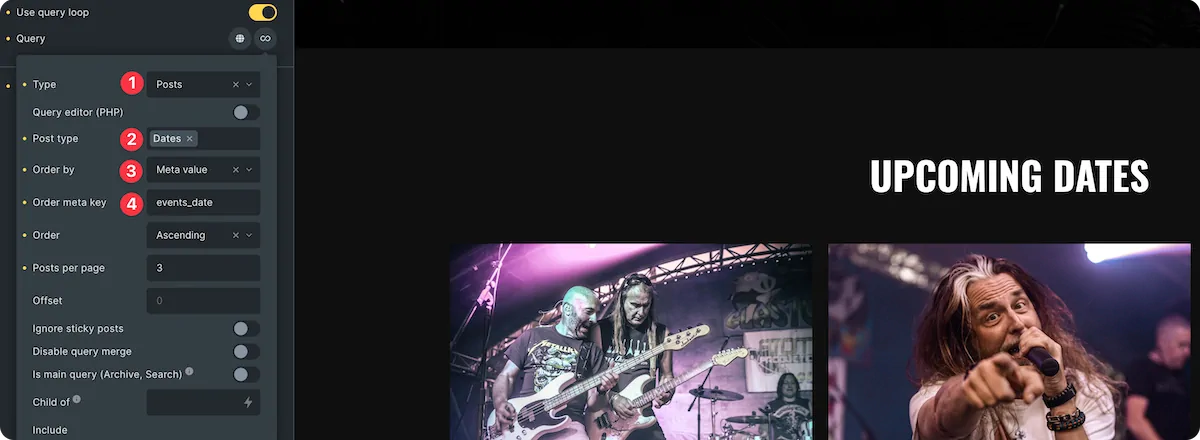
Step 4: Sorting Events Chronologically
- Adjust the Query: Within the query loop block settings, adjust the query to sort by the custom field (event date) in ascending order. Use the meta key corresponding to your event date field in ACF.
- Format the Date Display: To ensure the event date is user-friendly, use the formatting option available in Bricks Builder. This allows you to convert the ‘Ymd’ format to something more readable, like “March 30, 2023”.
Step 5: Automating Event Visibility
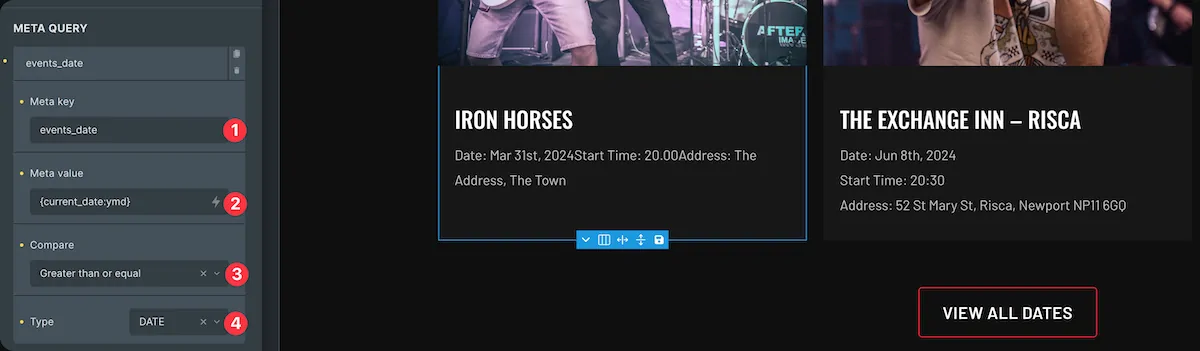
- Meta Query for Current Dates: To automatically hide past events, add a meta query to your event list query loop. This query should compare the event date to the current date and only show events that are today or in the future.
- Setting Up the Meta Query:
- Use the meta key for your event date.
- Set the meta value to compare against the current date (
25 July 2026in ‘Ymd’ format). - Choose the comparison type as ‘greater than or equal to’ to ensure only current and future dates are shown.
Step 6: Styling the Event List
- Grid Layout: To make your event list more visually appealing, switch the display to a grid layout. Adjust the columns, rows, and gaps according to your design preferences.
Finishing Touches
- Test Your Setup: After setting everything up, test your event list by adding, editing, and removing events to see how they automatically sort and hide based on the date.
- Customize Further: Explore additional styling and functionality options within Bricks Builder and ACF to further customize your event list.
By following these steps, you’ve created a dynamic and automated event listing on your website that sorts events chronologically and hides past events, all without needing to manually adjust each event. This setup not only enhances user experience but also streamlines your content management process.

