Building websites with Bricks Builder, one of the first things you’ll encounter is the need to create templates for various parts of your site. These templates range from full-page layouts to specific sections like headers, footers, or call-to-action blocks. But creating templates is only half the battle—you also need to know how to apply conditions to control where and when these templates appear.
In this guide, I’ll walk you through setting up templates and using conditions in Bricks Builder, helping you quickly create dynamic, flexible websites.
Why Templates Matter in Bricks Builder
Templates in Bricks Builder allow you to create reusable design elements that can be applied across multiple pages or sections of your website. For example, you might want the same header and footer on every page but a unique layout for blog posts or category archives. Templates save you time by allowing you to design these elements once and apply them wherever needed.
Types of Templates You Can Create
Bricks Builder offers a variety of template types, including:
- Header: A template for the top section of your site, usually containing navigation and branding.
- Footer: A template for the bottom section, often containing links, copyright information, and social media icons.
- Single: Used for individual posts or pages, such as blog posts or product pages.
- Section: A smaller part of a page, like a call-to-action or a subscription form.
- Archive: Templates for category or tag archives, displaying a list of posts or products.
- Pop-up: A template for pop-up windows.
- 404 Error Page: A custom template for when a page is not found.
How to Create a Template in Bricks Builder
Step 1: Access the Templates Section
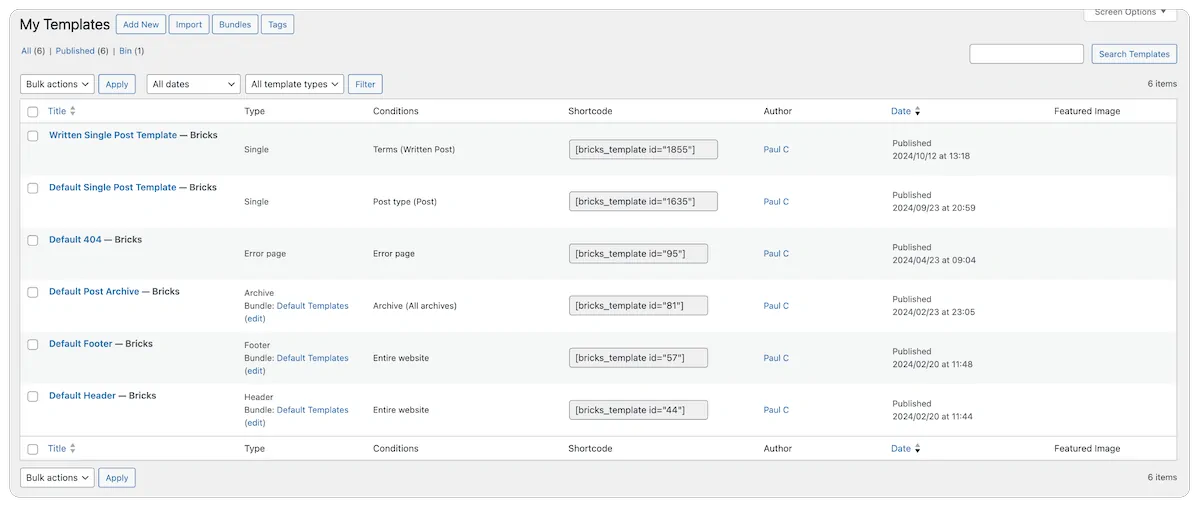
To start, navigate to the Bricks Builder menu and select “Templates.” Here, you’ll see a list of all the templates you’ve created and details like the template type, conditions, and a thumbnail preview.
Step 2: Add a New Template
Click the “Add New” button to create a new template. You’ll be prompted to give your template a name and select its type from a dropdown menu. For example, if you’re creating a template for a blog post archive, you would select “Archive.”
Step 3: Design Your Template
Once you’ve created your template, you’ll be taken to the Bricks Builder editor, where you can design it just like any other page. Add sections, containers, and elements like post listings, metadata, and social sharing buttons. Bricks Builder also provides dynamic elements like post titles and excerpts, automatically pulling content from your WordPress database.
Applying Conditions to Templates
Once your template is designed, the next step is to apply conditions to control where and when it appears on your site.
Step 1: Open Template Settings
In the Bricks Builder editor, click on the “Settings” icon and select “Template Settings.” Here, you’ll find options for setting conditions and populating content.
Step 2: Add a Condition
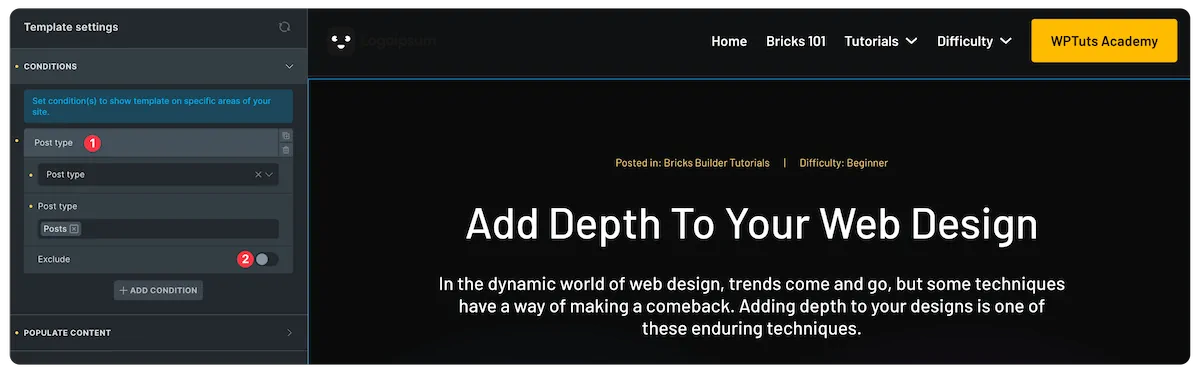
Click “Add Condition” to specify where this template should be used. You can choose from a variety of conditions, such as:
- Entire Website: Apply the template across your entire site.
- Front Page: Use the template only on the homepage.
- Post Type: Apply the template to specific post types like blog posts or products.
- Individual Pages: Select specific pages where the template should appear.
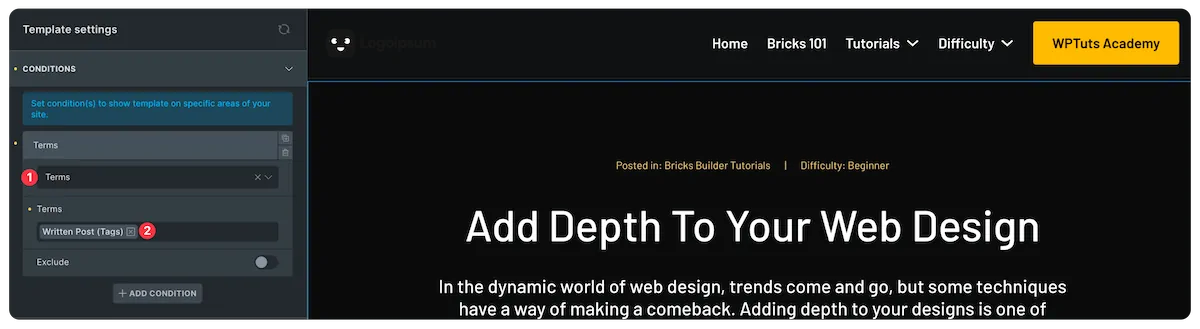
- Categories or Tags: Apply the template to posts within a specific category or tag.
You can also exclude certain pages or sections by adding an “Exclude” condition. For example, a header should appear on every page except the 404 error page.
Step 3: Save and Publish
Once you’ve set your conditions, click “Save” or “Publish” to make the template live. Bricks Builder will now automatically apply the template based on your conditions.
Creating Reusable Sections
What if you’ve designed a section on one page and want to reuse it elsewhere? Bricks Builder makes this easy with its “Save as Template” feature.
Step 1: Select the Section
In the Bricks Builder structure panel, right-click on the section you want to save and choose “Save as Template.”

Step 2: Name and Categorize the Template
Name your section and select its type (e.g., “Section”). You can also add tags to help organize your templates.
Step 3: Insert the Template Elsewhere
Once saved, you can insert this section into any other page or template by selecting it from the “Templates” menu. This is especially useful for elements like call-to-action blocks or subscription forms you want to reuse across multiple pages.
Advanced Conditions: Customizing Templates Based on Content
One of Bricks Builder’s most powerful features is the ability to create different templates for similar content types based on specific conditions. For example, you might want a different layout for blog posts that contain videos compared to those that only have images.
Step 1: Use Tags or Custom Fields
In your WordPress post editor, you can add a tag (e.g., “video post”) or a custom field (e.g., a YouTube video ID) to differentiate between different types of content.
Step 2: Create a New Template
Copy your existing post template and modify it to include a video element instead of a featured image, or start from scratch and build a different design. Then, go to the “Template Settings” and add a condition based on your set tag or custom field.
Step 3: Test Your Conditions
Once your conditions are set, test them by viewing posts with and without the tag or custom field. Bricks Builder will automatically apply the correct template based on your defined conditions.
Organizing and Managing Templates
As you create more templates, it’s important to keep them organized. Bricks Builder offers several tools to help with this:
- Template Tags: Use tags to group similar templates together, such as all your archive templates or WooCommerce templates.
- Template Bundles: Combine multiple templates, such as a homepage, about page, and blog post template, to create a cohesive design package.
- Template Previews: Enable template previews in the Bricks settings to see a thumbnail of each template, making it easier to find the one you need.
Conclusion
With Bricks Builder, creating and managing templates is a breeze. By understanding how to apply conditions, you can create dynamic, flexible websites that automatically adapt to different types of content. Whether you’re building a simple blog or a complex eCommerce site, mastering templates and conditions will save you time and effort while giving you complete control over your site’s design.

