In this tutorial, I’ll show you how to transform your WordPress dashboard into a sleek dark mode using a simple and free code snippet.
Getting Started
Before diving into the code, it’s important to note that this dark mode customization is not a one-size-fits-all solution. It’s a starting point that you can tweak to your liking. Also, remember to choose an admin colour scheme that complements your new dark mode. You can do this by navigating to Users > Profile and selecting an admin colour scheme that works well with the dark background.

Using a Code Snippet Plugin
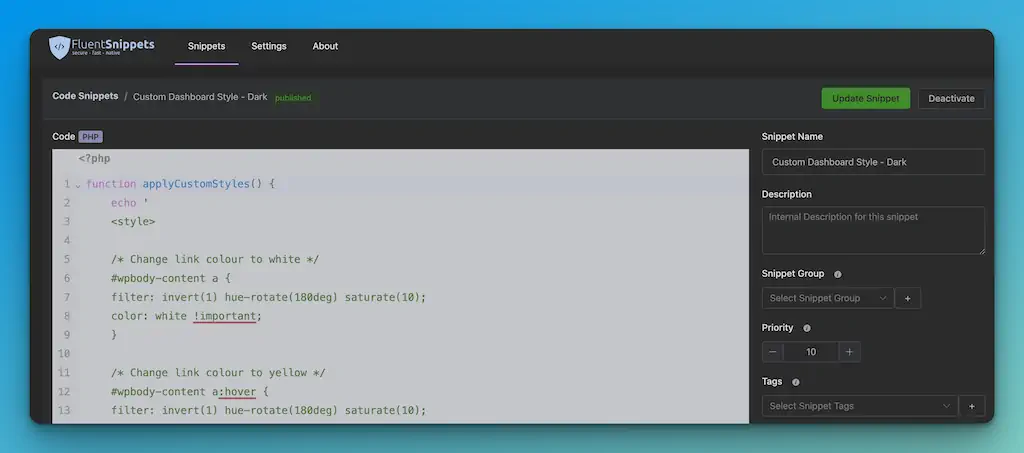
To apply the dark mode styles, you’ll need a code snippet plugin. Many options are available, but we’ll use Fluent Snippets, which is free for this tutorial. You can also use any other plugin to add custom PHP to your WordPress site.

Once you have your code snippet plugin installed and activated, you’ll need to create a new snippet with the provided PHP code. This code snippet will define a custom function called `apply_custom_styles` that applies CSS styles to the admin area of your WordPress site.
Understanding the Code
The dark mode transformation’s core lies in the CSS properties `filter: invert()` and `hue-rotate()`. These properties adjust the colours of the standard WordPress dashboard to create the dark mode effect.
For example, the code snippet will invert the colours and adjust the brightness to 85%, meaning black will become dark grey and white will become light grey.
Here’s a quick rundown of what the code does:
- Inverts colours for the overall dashboard.
- Adjusts link colours to a lighter shade for better visibility.
- Customizes hover colours for interactive elements.
- Allows you to set specific colours for text and links.
<?php
function applyCustomStyles() {
    echo '
    <style>

    /* Change link colour to white */
    #wpbody-content a {
    filter: invert(1) hue-rotate(180deg) saturate(10);
    color: white !important;
    }

    /* Change link colour to yellow */
    #wpbody-content a:hover {
    filter: invert(1) hue-rotate(180deg) saturate(10);
    color: red !important;
    }

    /* Styling for primary content area. */
    .block-editor-page .editor-styles-wrapper {
      color: lightgray;
      background: #262626;
    }

    /* Base styling adjustments. */
    .wp-admin {
      background-color: #262626;
    }

    /* Image display corrections. */
    .wp-admin #wpbody img {
      filter: invert(1) hue-rotate(-180deg);
      background: white;
    }

    /* Enhancements for hyperlink visuals. */
    .block-editor-page .editor-styles-wrapper a {
      filter: invert(0.85) hue-rotate(185deg);
    }

    /* Filter reset for specific editor sections. */
    .block-editor-page #wpbody {
      filter: unset;
    }

    /* Adjustments for the main body appearance. */
    .wp-admin #wpbody {
      filter: invert(0.85) hue-rotate(185deg);
    }

    /* Sidebar appearance customization. */
    .block-editor-page .interface-interface-skeleton__sidebar,
    .block-editor-page .interface-interface-skeleton__secondary-sidebar {
      filter: invert(0.85) hue-rotate(185deg);
    }

    /* Configuration for top navigation bar. */
    .block-editor-page .interface-interface-skeleton__header {
      filter: invert(0.85) hue-rotate(185deg);
    }

    /* Primary action button styling. */
    .block-editor-page .is-primary {
      color: black !important;
    }

    /* Lower section layout adjustments. */
    .block-editor-page .edit-post-layout__metaboxes {
      border-top: 0px;
      background-color: #262626;
    }

    /* Reset various button BG colours */
    .wrap .add-new-h2, .wrap .add-new-h2:active, .wrap .page-title-action, .wrap .page-title-action:active {
    background:#f6f7f700;
    }

    </style>';
}
add_action('admin_head', 'applyCustomStyles');
Function Explanation
- Function Definition: The snippet starts with
<?php, indicating that it is written in PHP. Then, it defines a function namedapplyCustomStyles()which, when called, will execute the code inside its curly braces{}.
function applyCustomStyles() {
    // Function content goes here
}- Echo Statement: Inside the function, the
echostatement outputs a block of CSS styles as a string. These styles are wrapped in<style>tags, making them ready to be applied to the HTML document.
echo '
    <style>
    /* CSS rules */
    </style>
';
CSS Styles Explanation
The CSS within the <style> tags aims to customize the appearance of various elements within the WordPress admin dashboard. Let’s break down some of the key styles:
- Link Color Change: The first rule targets all anchor (
<a>) tags within an element with the ID#wpbody-content, changing their color to white and applying a filter to invert colors and adjust hue and saturation. On hover, these links change to red.
#wpbody-content a {
    filter: invert(1) hue-rotate(180deg) saturate(10);
    color: white !important;
}

#wpbody-content a:hover {
    color: red !important;
}- Primary Content Area Styling: Changes the colour and background of the primary content area to light grey text on a dark background.
.block-editor-page .editor-styles-wrapper {
    color: lightgray;
    background: #262626;
}- Admin Background Color: Sets the background colour of the WordPress admin area to a dark colour.
.wp-admin {
    background-color: #262626;
}- Image Display Corrections: Inverts the colours of images to ensure they are visible against the dark background.
.wp-admin #wpbody img {
    filter: invert(1) hue-rotate(-180deg);
}- Additional Styling: More rules adjust the appearance of hyperlinks, reset filters in specific sections, and customize the sidebar, header, and action buttons to fit the overall dark theme.
Adding the Function to WordPress
- Add Action Hook: At the end of the snippet, the
add_action()function is used to addapplyCustomStylesto theadmin_headaction hook. This tells WordPress to executeapplyCustomStyleswhen the admin head is being loaded, injecting the custom styles into the admin dashboard.
add_action('admin_head', 'applyCustomStyles');Customizing the Code
Feel free to modify the CSS in the code snippet to suit your preferences. If you want to change the link colours or text brightness, edit the corresponding CSS values in the snippet.
For example, if you want to change the hover colour for links, locate the CSS class for link hover and update the colour value. The code is commented on, making it easier to understand which parts control different dashboard elements.
Applying the Code
After customizing the code snippet, save and activate it within your code snippet plugin. The changes should take effect immediately, transforming your WordPress dashboard into dark mode.
Final Thoughts
This dark mode customization is a fun and easy way to personalize your WordPress experience. Remember, it’s a starting point, so don’t be afraid to experiment and tweak the code to get the exact look you want.
If you make any exciting modifications, share your results! It’s always great to see how different users adapt the code to fit their style.
Happy customising!

